How to use Cymo Note to assist interpretation
Updated on Aug 19, 2025
Hi there, fellow interpreter! We are glad you have decided to let Cymo Note assist your interpretation and help you harness the power of technology and step up your career.
This article explains how to set up your audio routing for your online and on-site meetings, so that you can use Cymo Note when you are interpreting consecutively or simultaneously.
Before we begin, please note that as physical cables are necessary in onsite meetings, investing in a set of the recommended cables, and learning how to connect them to your personal devices will be worthwhile in the long run.
Onsite / Hybrid Meetings
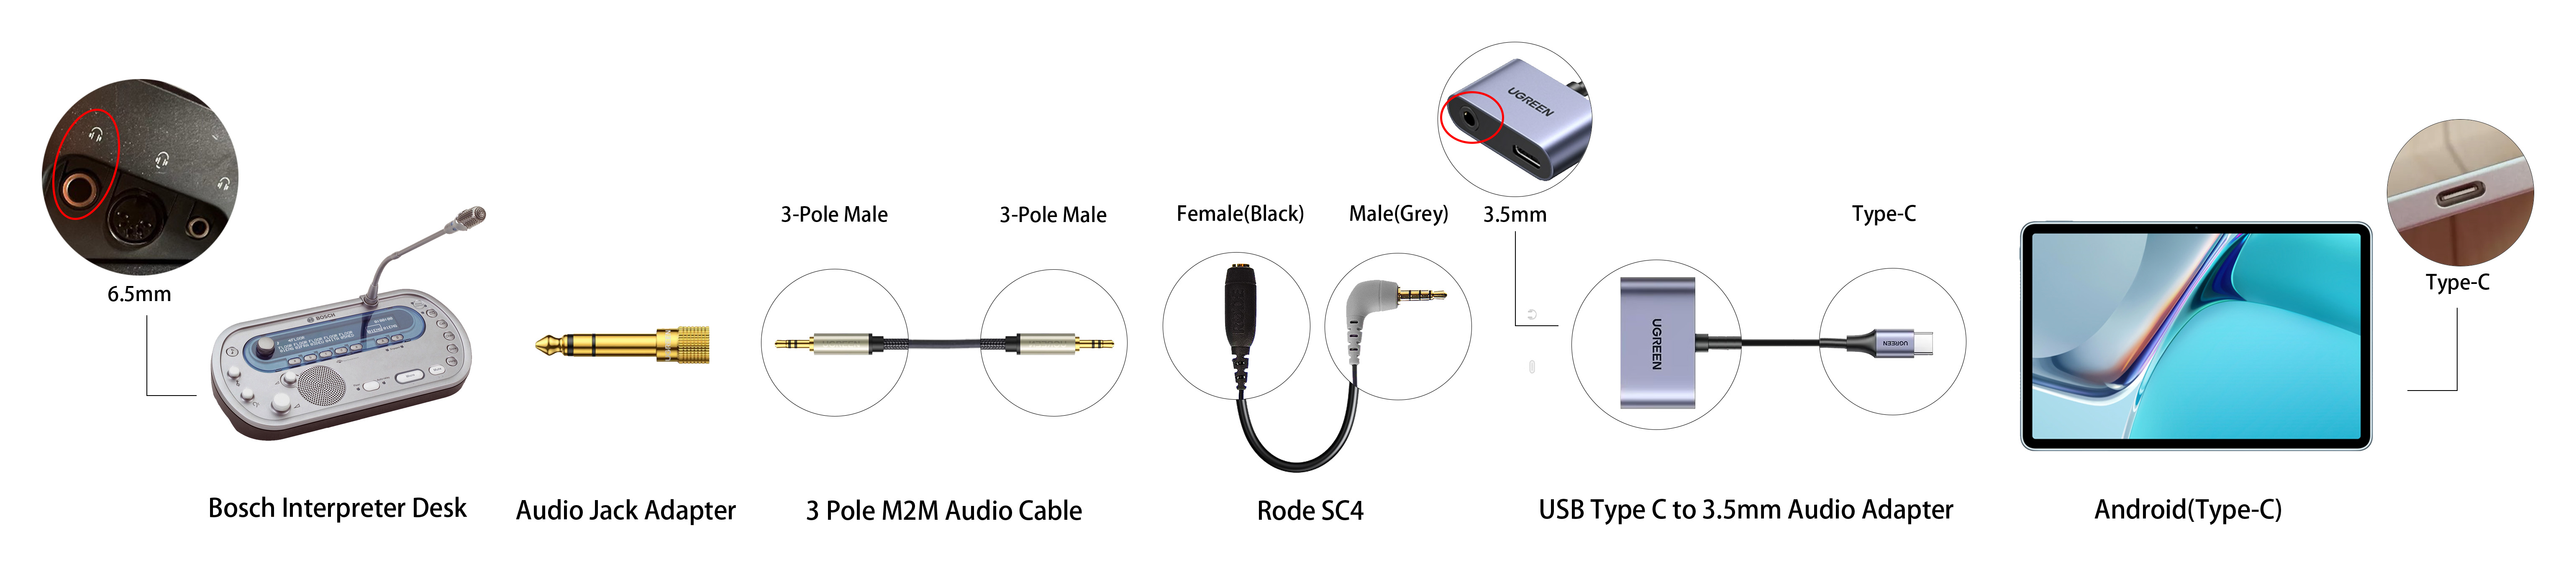
Let's start with your preferred personal device and walkthrough how to connect your preferred device with Cymo Note to a Bosch interpreter console as an example.
By clicking the the physical cable names highlighted in blue below, you will be redirected to the corresponding buying pages on Amazon U.S. If you want to shop in China Mainland, please visit the Chinese site of this page. If the provided shopping sites does not provide shipping to your location, do a keyword search on your preferred online retailers. You will find such products easily as they are widely available globally.
DISCLAIMER: We are not affiliated with any of the vendor sites linked in this article.
Mac or PC computers + JOYO mixer
To connect a Mac or PC computer with an interpreting console, you will need the following cables and adapters:
- UGREEN male-to-male audio AUX cable.
- Amazon Basics Gold Plated 6.35mm to 3.5mm adapter.
- JOYO Momix Cab internal recording audio mixer.
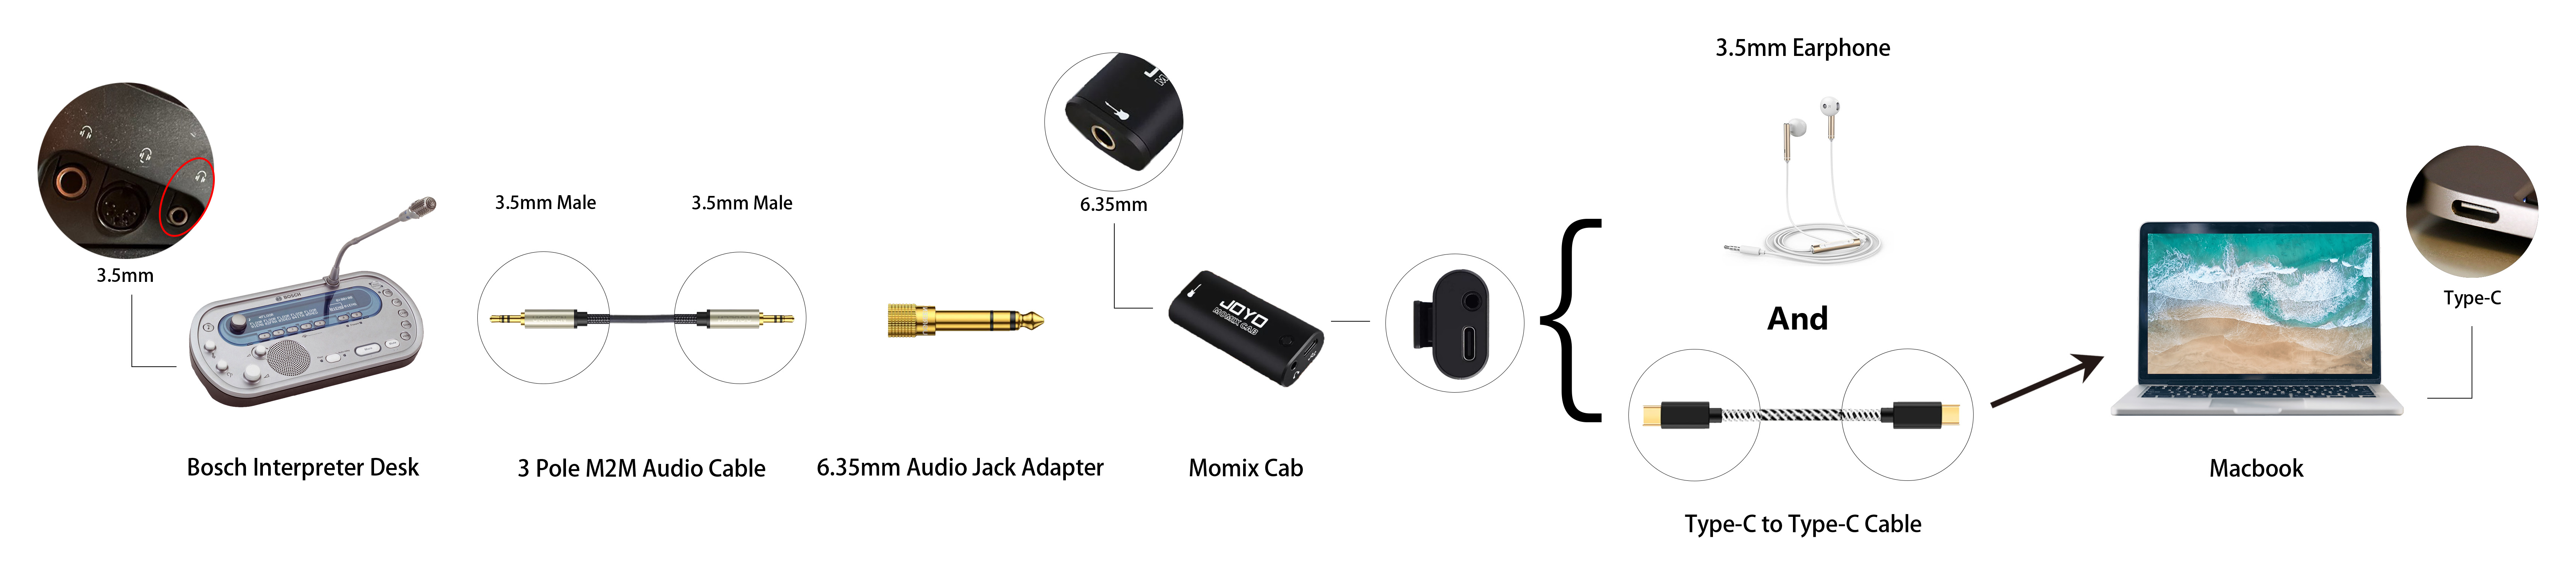
Connecting to Mac or Macbook
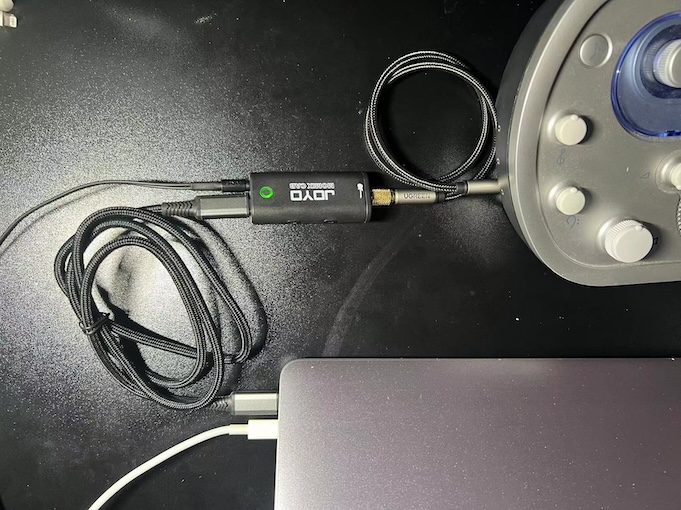
Start with one end of the UGREEN male-to-male audio cable, and connect its one end to your interpretation console's headphone port, then connect the other end to the 6.35mm Audio Jack Adapter, then into the 6.35mm female port of the JOYO mixer. Connect the mixer with your computer next using the USB-C to USB-C cable that comes with the mixer. Finally, insert your headphones to the mixer and adjust the volume using the buttons on the side. Remember to refresh the device list inside Cymo Note and select the Momix Cab as the audio source.
Connecting to Mac or Macbook
We recommend all users to use Cymo Note with a Mac or PC computer for the following reasons:
- It is easier to use a standard keyboard for glossary management and other text processing features in Cymo Note.
- Mac and PC computers can be connected to power while using. Tablets devices may need additional splitters for power and usually their battery is not enough for a full day's use.
- Cymo Note offers a useful file drag-n-drop feature for text extraction and analysis on PC and Mac computers.
- While tablets offers hand writing and touch features like text selection, such features still require a bit of training to master. Meanwhile, text selection with a touchpad or mouse is more intuitive and requires no training.
- Cymo ASR Engine and its membership is not supported on tablets or phones.
We recommend JOYO Momix Cab audio mixer more than other connection methods as it has the following advantages in an interpreting scenario:
- JOYO mixer is a small and portable internal recording sound card with high fidelity at a good price.
- It does not introduce interference when your computer is connected to a power source, which is crucial if you need to interpret for a long period of time.
- It is a USB-powered audio interface. Compared to other non-powered channel splitting methods, it will not lower the volume in your headphones. But please make sure your computer is always on while using JOYO mixer or there will be no sound.
- It has excellent performance in preventing acoustic shock and is tested to protect your hearing. If the volume is too loud resulting in distortion, the light on the mixer will turn from green to red and it automatically shave the peak volume signals.
- It has volume adjustment buttons. Making it easy to find the right volume mix for you and Cymo Note.
- It is easy to setup as all its ports are well designed to suit their specific connection purposes.
- It can convert mono channel from older interpreting consoles such as Prosys into stereo channels.
- Cymo is not affiliated with JOYO or any vendor of the audio mixer when making this recommendation.
Other connection methods by device:
iPad (newer versions, Type-C port)
If you'd like to use one of the newer iPads with the Type-C port, you can use the recommended set of cables (recommended), or use the following cables and adapters.
- Amazon Basics Gold Plated 6.35mm to 3.5mm adapter.
- UGREEN male-to-male audio AUX cable.
- Rode SC4 adapter.
- Belkin USB-C to 3.5mm headset and charger adapter.
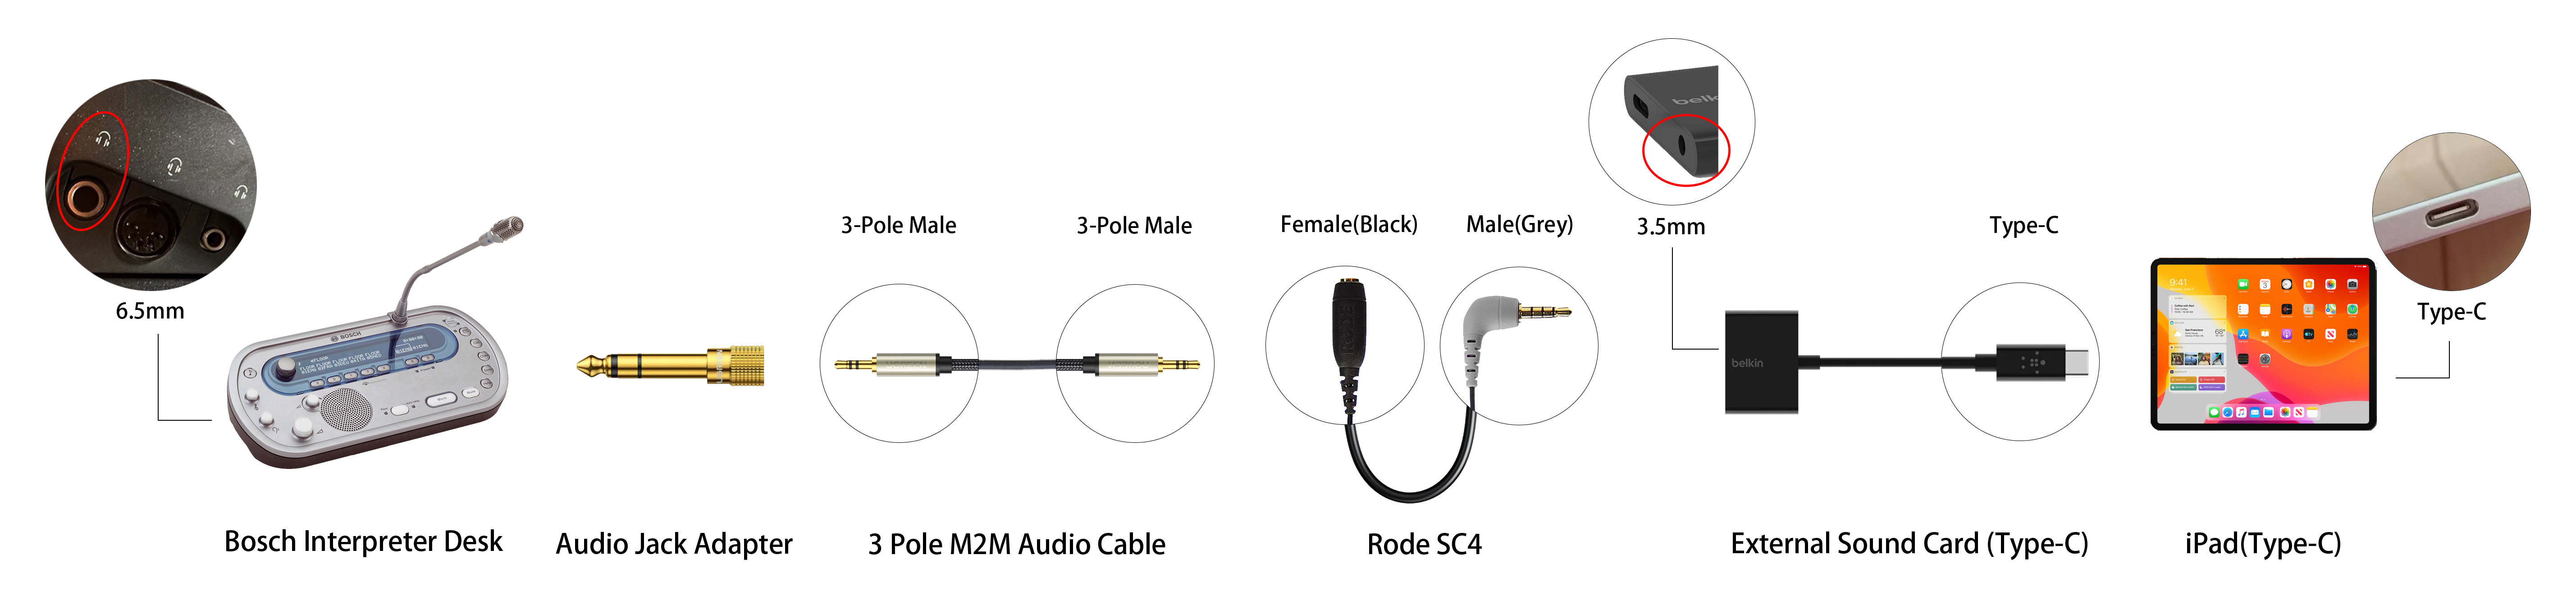
iPad (newer versions, Type-C port)
Start with one end of the UGREEN male-to-male audio cable, and connect it to the female port of the 6.5mm to 3.5mm adapter. It does not matter which end of the male-to-male you start with. Connect the male end of the 6.5mm adapter into the female 6.5mm port on the Bosch console. Plug the other male end of the UGREEN male-to-male audio cable into the female port of the Rode SC4 colored black. Then, plug the male end (TRRS) of the Rode SC4 into the headset jack on the Belkin USB-C to headset and charger adapter, usually marked with a (). Finally, plug the USB-C end of the Belkin adapter into the USB-C terminal of your iPad. The system should automatically source the audio signal from the connection.
For Apple mobile devices such as iPads and iPhones, make sure to disable its "Hey Siri" function to avoid accidentally triggering Siri while using Cymo Note.
iPad (older versions, lightning port)
If you'd like to use Cymo Note on an older iPad with a lightning port, you will need the following cables and adapters.
- Amazon Basics Gold Plated 6.35mm to 3.5mm adapter.
- UGREEN male-to-male audio AUX cable.
- Rode SC4 adapter.
- Belkin RockStar Lightning to 3.5mm Audio Cable + Audio Charger Splitter.

iPad (older versions, 3.5mm audio port)
Start with one end of the UGREEN male-to-male audio cable, and connect it to the female port of the 6.5mm to 3.5mm adapter. It does not matter which end of the male-to-male you start with. Connect the male end of the 6.5mm adapter into the female 6.5mm port on the Bosch console. Plug the other male end of the UGREEN male-to-male audio cable into the female port of the Rode SC4 colored black. Then, plug the male end (TRRS) of the Rode SC4 into the headset jack on the Apple MFi certified lightning to charger and 3.5mm audio adapter, usually marked with a (). Finally, connect the lightning connector into your iPad's lightning port. Be sure to disable your iPad's "Hey Siri" function to avoid accidentally triggering Siri. Your system should default to sourcing sound from the plugged-in audio cable.
For Apple mobile devices such as iPads and iPhones, make sure to disable its "Hey Siri" function to avoid accidentally triggering Siri while using Cymo Note.
iPhone (lightning port)
- Amazon Basics Gold Plated 6.35mm to 3.5mm adapter.
- UGREEN male-to-male audio AUX cable.
- Rode SC4 adapter.
- Belkin RockStar Lightning to 3.5mm Audio Cable + Audio Charger Splitter.
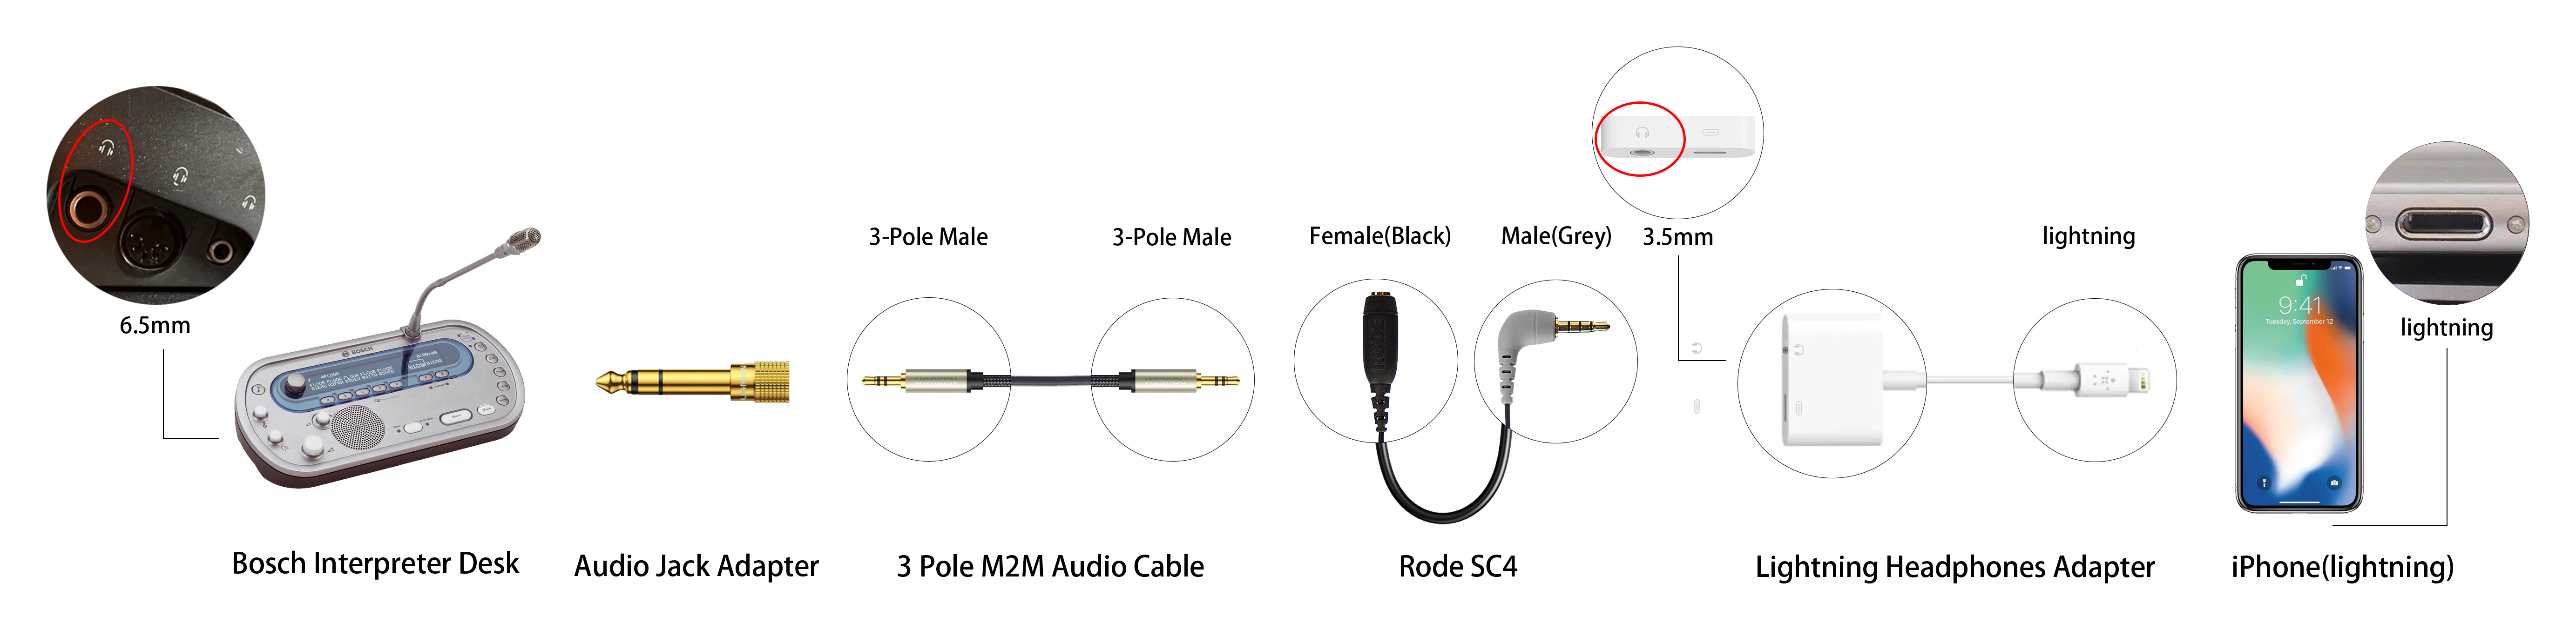
iPhone (lightning port)
Start with one end of the UGREEN male-to-male audio cable, and connect it to the female port of the 6.5mm to 3.5mm adapter. It does not matter which end of the male-to-male you start with. Connect the male end of the 6.5mm adapter into the female 6.5mm port on the Bosch console. Plug the other male end of the UGREEN male-to-male audio cable into the female port of the Rode SC4 colored black. Then, plug the male end (TRRS) of the Rode SC4 into the headset jack, usually marked with a (), on the Apple MFi certified lightning to charger and 3.5mm audio adapter. Finally, plug the lightning connector into your iPhone's lightning port. The system should automatically source the audio signal from the connection.
For Apple mobile devices such as iPads and iPhones, make sure to disable its "Hey Siri" function to avoid accidentally triggering Siri while using Cymo Note.
Android tablet or phone (Type-C port)
If you'd like to use Cymo Note on your Android smartphone or tablet, you will need the following cables and adapters.
- Amazon Basics Gold Plated 6.35mm to 3.5mm adapter.
- UGREEN male-to-male audio AUX cable.
- Rode SC4 adapter.
- Android compatible USB-C to 3.5mm headset and charger adapter. ning to 3.5mm Audio Cable + Audio Charger Splitter.
Android tablet or phone (Type-C port)
Start with one end of the UGREEN male-to-male audio cable, and connect it to the female port of the 6.5mm to 3.5mm adapter. It does not matter which end of the male-to-male you start with. Connect the male end of the 6.5mm adapter into the female 6.5mm port on the Bosch console. Plug the other male end of the UGREEN male-to-male audio cable into the female port of the Rode SC4 colored black. Then, plug the male end (TRRS) of the Rode SC4 usually colored gray, into the headset jack, usually marked (), on the Android compatible USB-C to headset and charger adapter. Finally, plug the USB-C end of the adapter into the USB-C terminal on your Android device. The system should automatically source the audio signal from the connection.
Troubleshooting
1. Input device is not detected while cables are connected correctly.
- Check your adapters and cables and please use the recommended and tested ones.
- Make sure your cables are tightly connected.
- Check if microphone permission is granted (at system level and inside browser).
- Press the refresh button in the device list panel to refresh devices.
2. Input device is detected and selected, but the volume indicator stays zero and there is no recognition result.
- Make sure you have selected the right audio input device.
- Try turning up the audio input volume.
- If you are connecting from an SI receiver, please make sure it is placed outside the booth and can receive wireless signals well. There must be a direct line of sight between the receiver and the infrared transmitter.
3. The volume indicator is moving slightly but there is no recognition result.
- Make sure your cables are tightly connected.
- Try turning up the audio input volume.
- see 4. below.
4. The recognition result is choppy and in broken sentences.
- Avoid charging your device while using an external audio input. Some devices will have electric current interference while charging.
- Make sure your audio cable has good shielding against interference. Please use the recommended cables. Make sure your audio cables are not placed next to power cords.
- Try adjusting the volume of your input source.
- If you are connecting from an SI receiver, please make sure it is placed outside the booth and can receive wireless signals well. There must be a direct line of sight between the receiver and the infrared transmitter.
5. After I have connected the cables, my headphone volume is lowered.
- This is normal as the audio signal is splitted into two. Simply turn up the volume on your console. If it is still not loud enough:
- Ask your technician to turn up the volume from the stage audio mixer.
- Remind the speakers to speak up or speak closer to the mic.
If you have followed the steps above, the issues still persist. Please try restarting Cymo Note, or refreshing the webpage if you are using it in a browser. Then try rebooting your device. If it still fails to work. Please contact info@cymo.io. We are ready to give you one-on-one assistance any time.
Remote meetings
Macs (Macbooks, Mac Mini, iMacs)
For Macs with Apple Chip:
Best solution:
Starting from Cymo Note v4.0.0, you can capture system audio directly by selecting "System audio" at the microphone menu.
1. Download the desktop version of Cymo Note.
2. Click on the bottom left microphone button to show the device menu.
3. Select "System audio" as the input source.
You're all set! Enjoy!
For Macs with Intel Chip:
Software solution for Cymo Engine:
Cymo Audio Driver (Free).
1. Download and install Cymo Audio Driver.
2. Setup Multi-output Device in Audio MIDI Setup.
3. Select Multi-output Device as system audio output.
4. Select CymoVirtualCable 2ch as the input Device in Chrome Settings.
Chrome settings url:
chrome://settings/content/microphone
5. Open Cymo Volume Controller if you want to adjust system audio volume.
Click Here to download and learn more.
When installing, Mac OS may show security prompts, you can refer to Apple's instruction on Safely open apps on your Mac to complete installation.
Hardware approach for Macs (For advanced users who prefer using physical cables)
MAC CASE 1
If you are using these microphones:
- USB standalone microphone (recommended)
- Laptop microphone
You will need the recommended set of cables, i.e. a TRS splitter, a TRS audio cable, and a USB adapter.
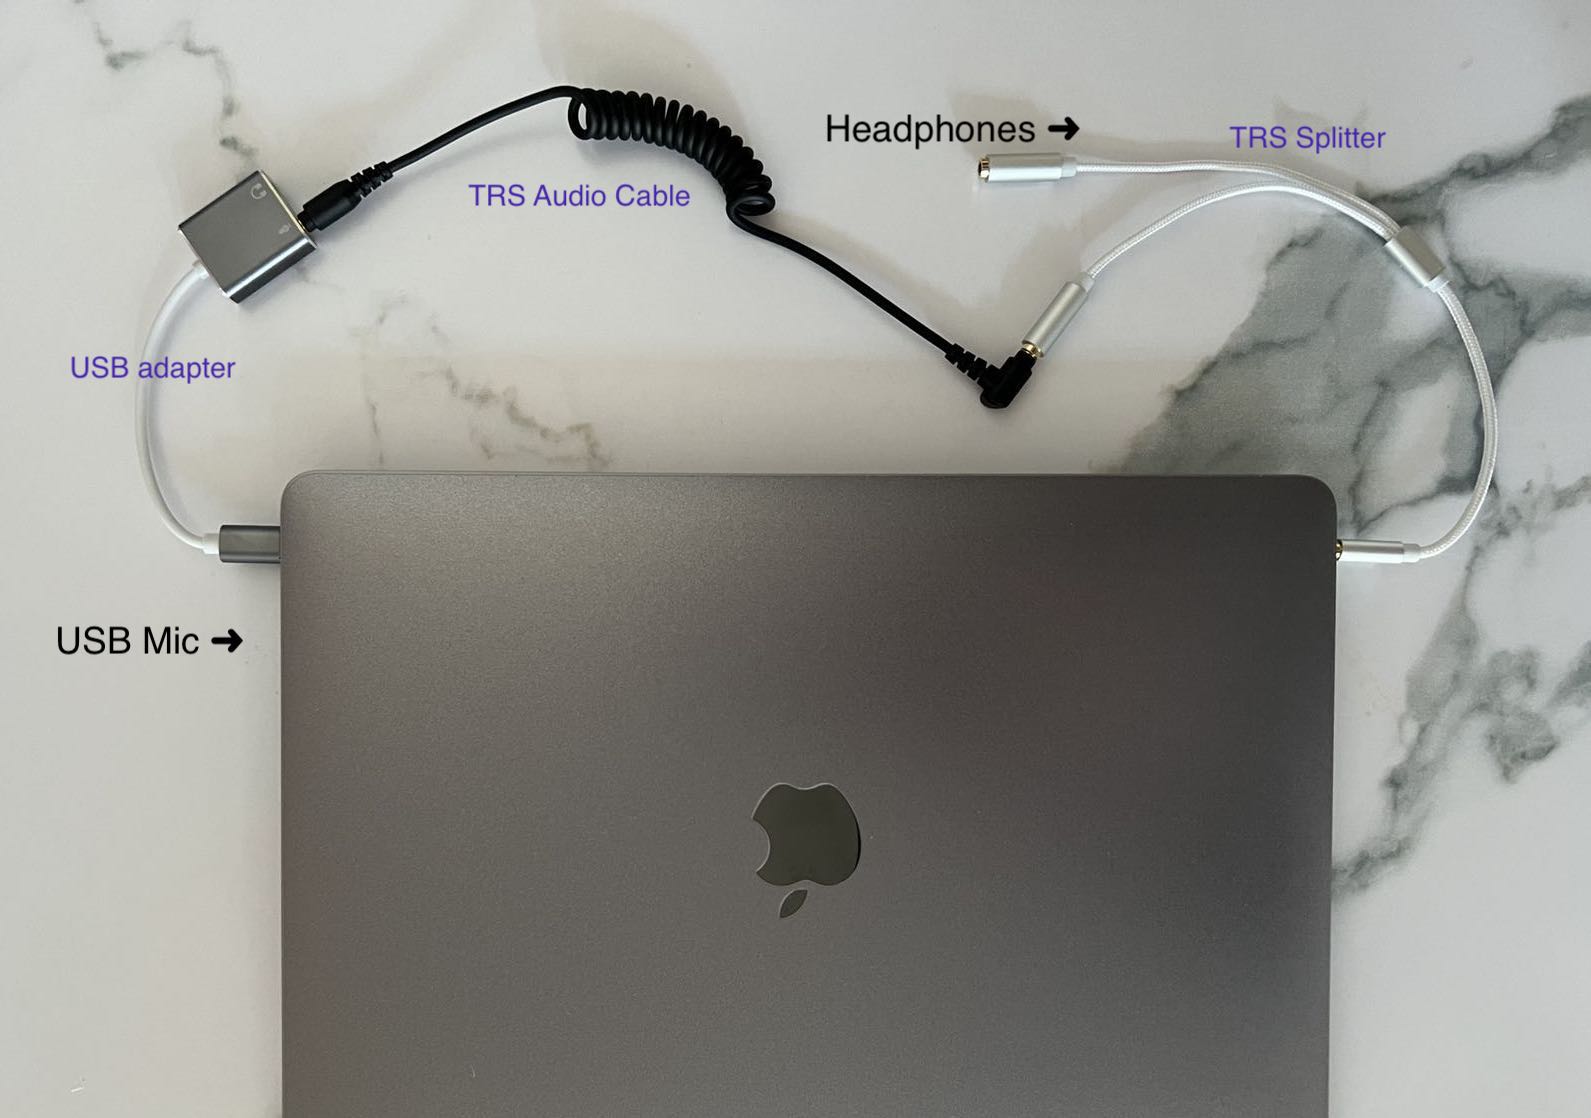
- Plug the male jack of a TRS splitter into your computer's speaker output port.
- Plug your headphone jack into either one of the TRS splitter's female ports to listen.
- Connect the other female port of the TRS splitter with a TRS audio cable.
- Plug the other end of the TRS audio cable into the microphone port of a USB adapter.
- Insert the USB adapter back to your computer's USB port.
- In the Cymo Note Settings page, choose the USB adapter as the audio input source. (Refresh your device list if needed).
- Check and make sure your headphones and microphone are working correctly in your video conferencing software.
You're all set!
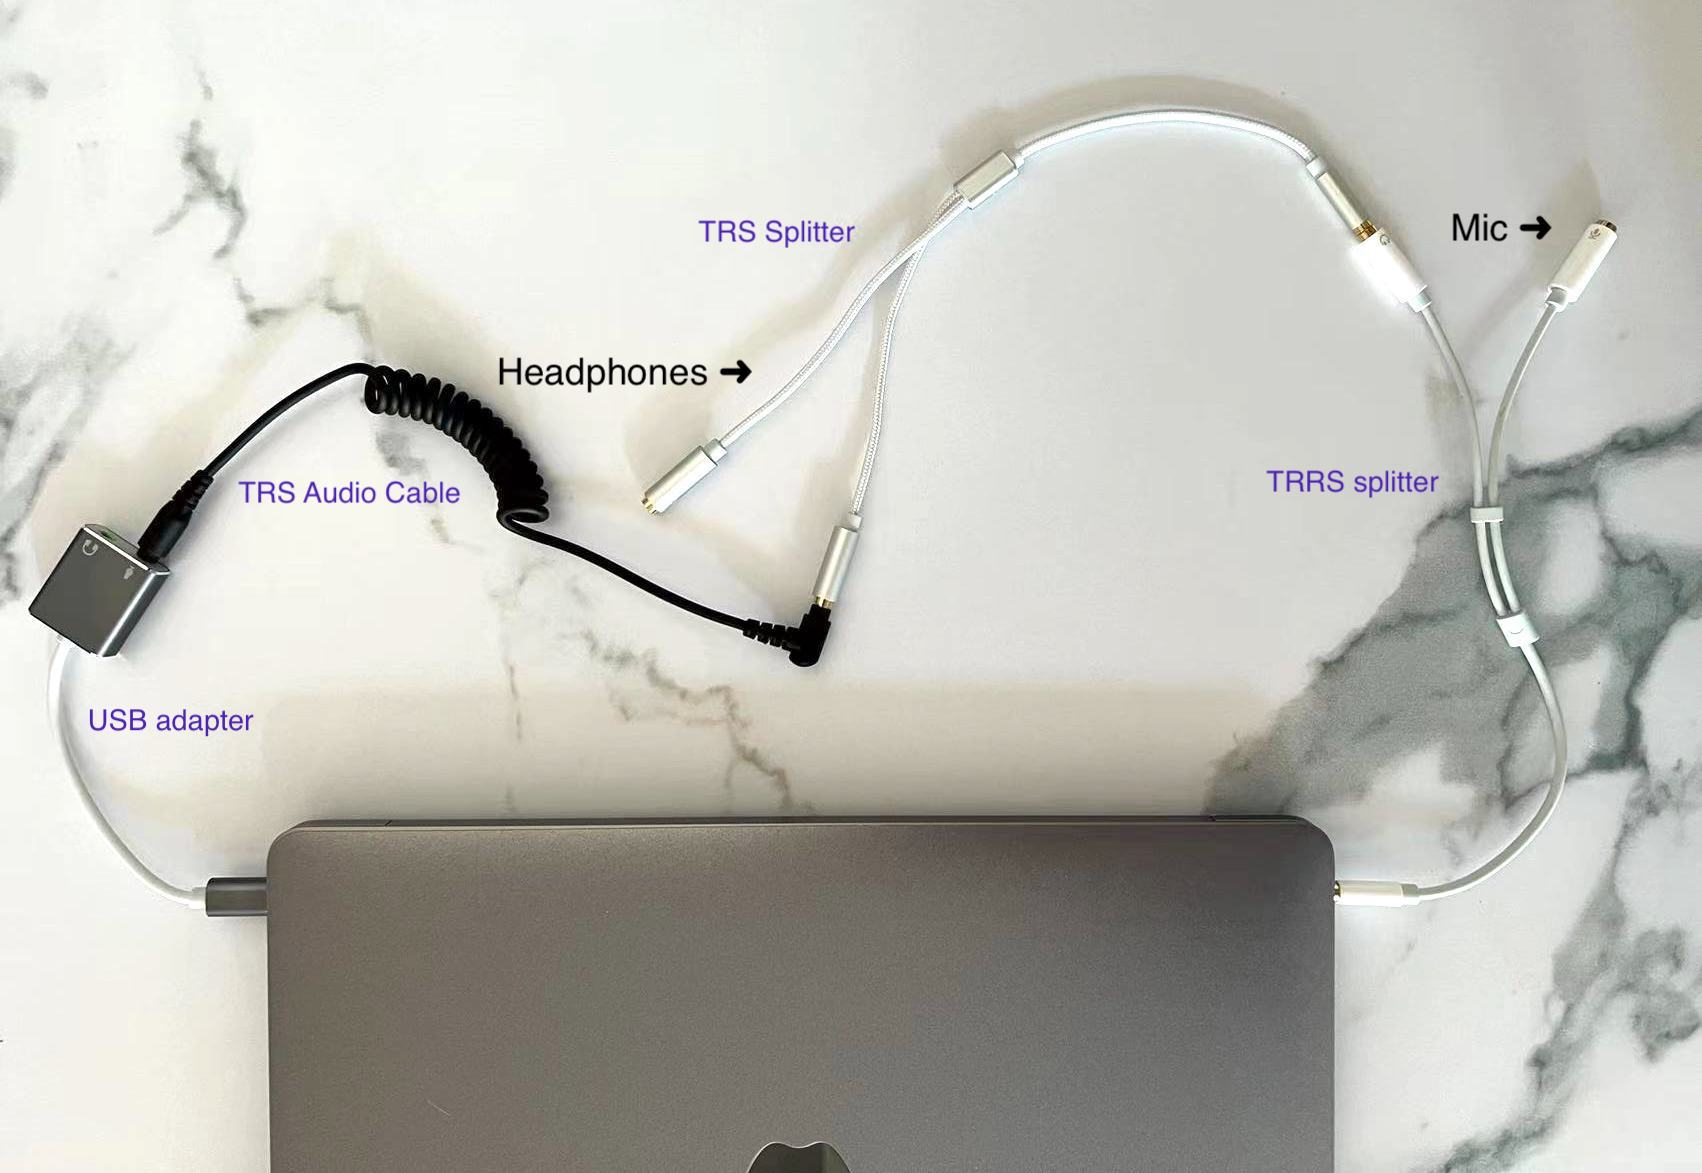
MAC CASE 2
If you are using these microphones:
- A headset with a microphone.
- A standalone 3.5mm jack microphone separate from headphone.
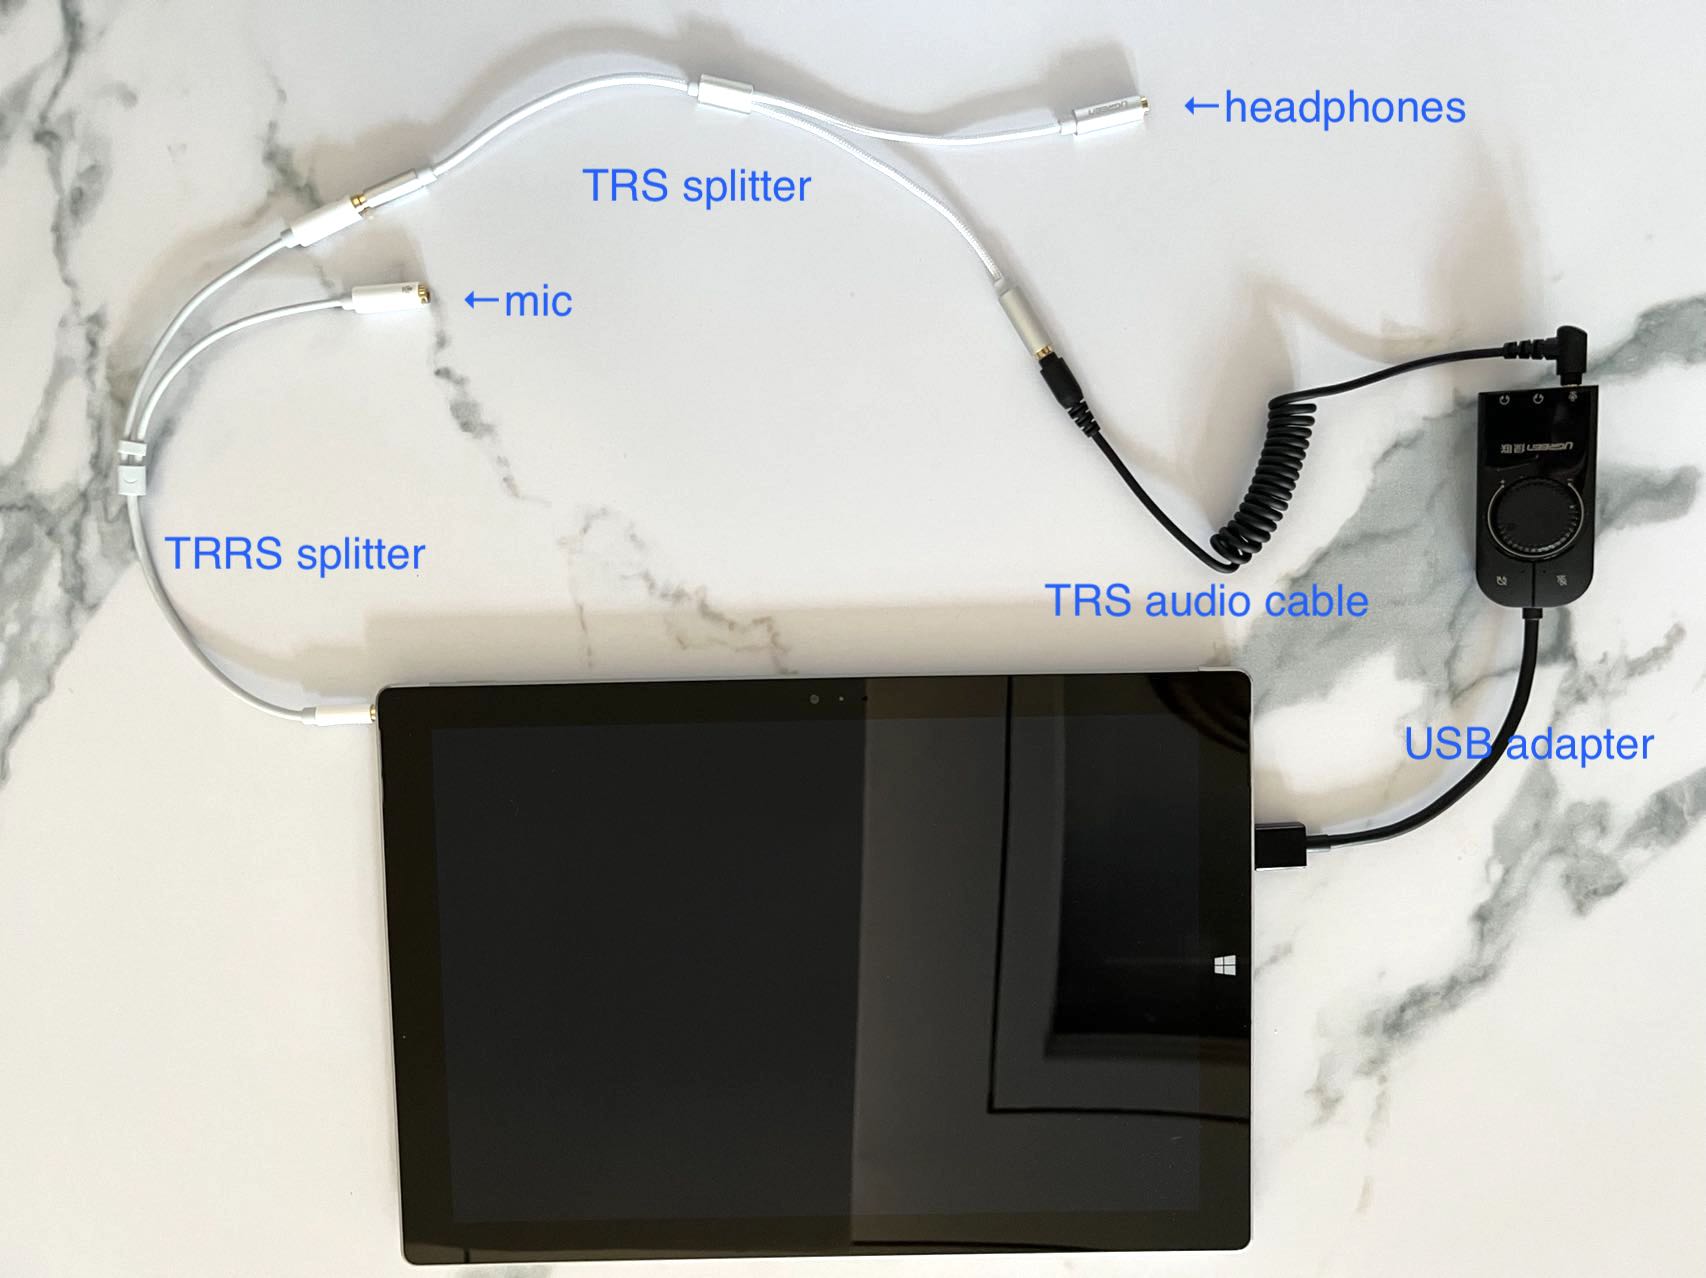
If your computer only has one integrated audio port, you will need to plug in an extra TRRS splitter. As shown on the image.
You will need the recommended set of cables, i.e. a TRS splitter, a TRS audio cable, and a USB adapter.
- Before the step 1 above, plug in the TRRS splitter first into your computer's audio port.
- Then plug the male jack of a TRS splitter into the TRRS splitter's headphone port.
- Follow the rest of the steps as described in CASE 1 above.
Windows PC
Software approach
PC Recommended Solution (using "System audio" directly in the windows app)
1. Download the desktop version of Cymo Note.
2. Click on the bottom left microphone button.
3. Select "System audio" as the input source.
You're all set! Enjoy!
Other PC Cases that supports Cymo Engine
-
If your PC is using a Realtek sound card, and you are using headphones with a 3.5mm audio jack(s).
- Go to Windows Start Menu > PC Setting > System > Sound > Sound
control
panel.
(Or press Windows Key + R, input "mmsys.cpl sounds" then press Enter.) - In the Playback tab, select Speakers (Realtek Audio) as your default playback device. You will need to select this device as your audio output device on your meeting platform as well.
- Go to the Recording tab, right click on the empty space and select Show Disabled Devices, then right click and enable Stereo Mix (Realtek Audio)
- Double check if you have selected your microphone as your default device. You can also choose your microphone on your meeting platform.
- In Cymo Note, select Stereo Mix (Realtek Audio) in the audio source dropdown menu. You should be able to recognize system audio now!
-
Another PC solution requires additional software VB-Cable (free) and Audio Repeater Pro (paid with free trial).
The main idea is to send your system audio to your headphones, then replicate this audio channel and send it to a virtual cable for speech recognition.
NOTE:The free version of Audio Repeater Pro has periodic silence. You can try it out first and make sure it works before you make a purchase.
- Download VB-Cable and Audio Repeater Proand install them. (You need to right click VB-Cable installer > Run as administrator to install it properly.)
- Restart your computer.
- Select your personal headphones as your system audio output device.
- Open Audio Repeater Pro.
Select your personal headphones (speakers) as Input Device (Wave in).
Select Cable Input (VB-Audio Virtual Cable) as Output Device (Wave out). - Click "Start" to send audio into the vitrual cable.
- In Cymo Note, select Cable Output (VB-Audio Virtual Cable) in the audio source dropdown menu. You should be able to recognize system audio now!
- The microphone setup is unaffected using this method.
There are several other software that do the same job but are more advanced and complex. If you are interested, you may also want to check out VAC Audio Repeater (Free) and VB-Audio Voicemeeter (Free donationware) .
Hardware approach on a PC (using physical cables).
PC CASE 1:
If you are using these microphones:
- standalone microphone (recommended)
- microphone
You will need the recommended set of cables, i.e. a TRS splitter, a TRS audio cable, and a USB adapter.
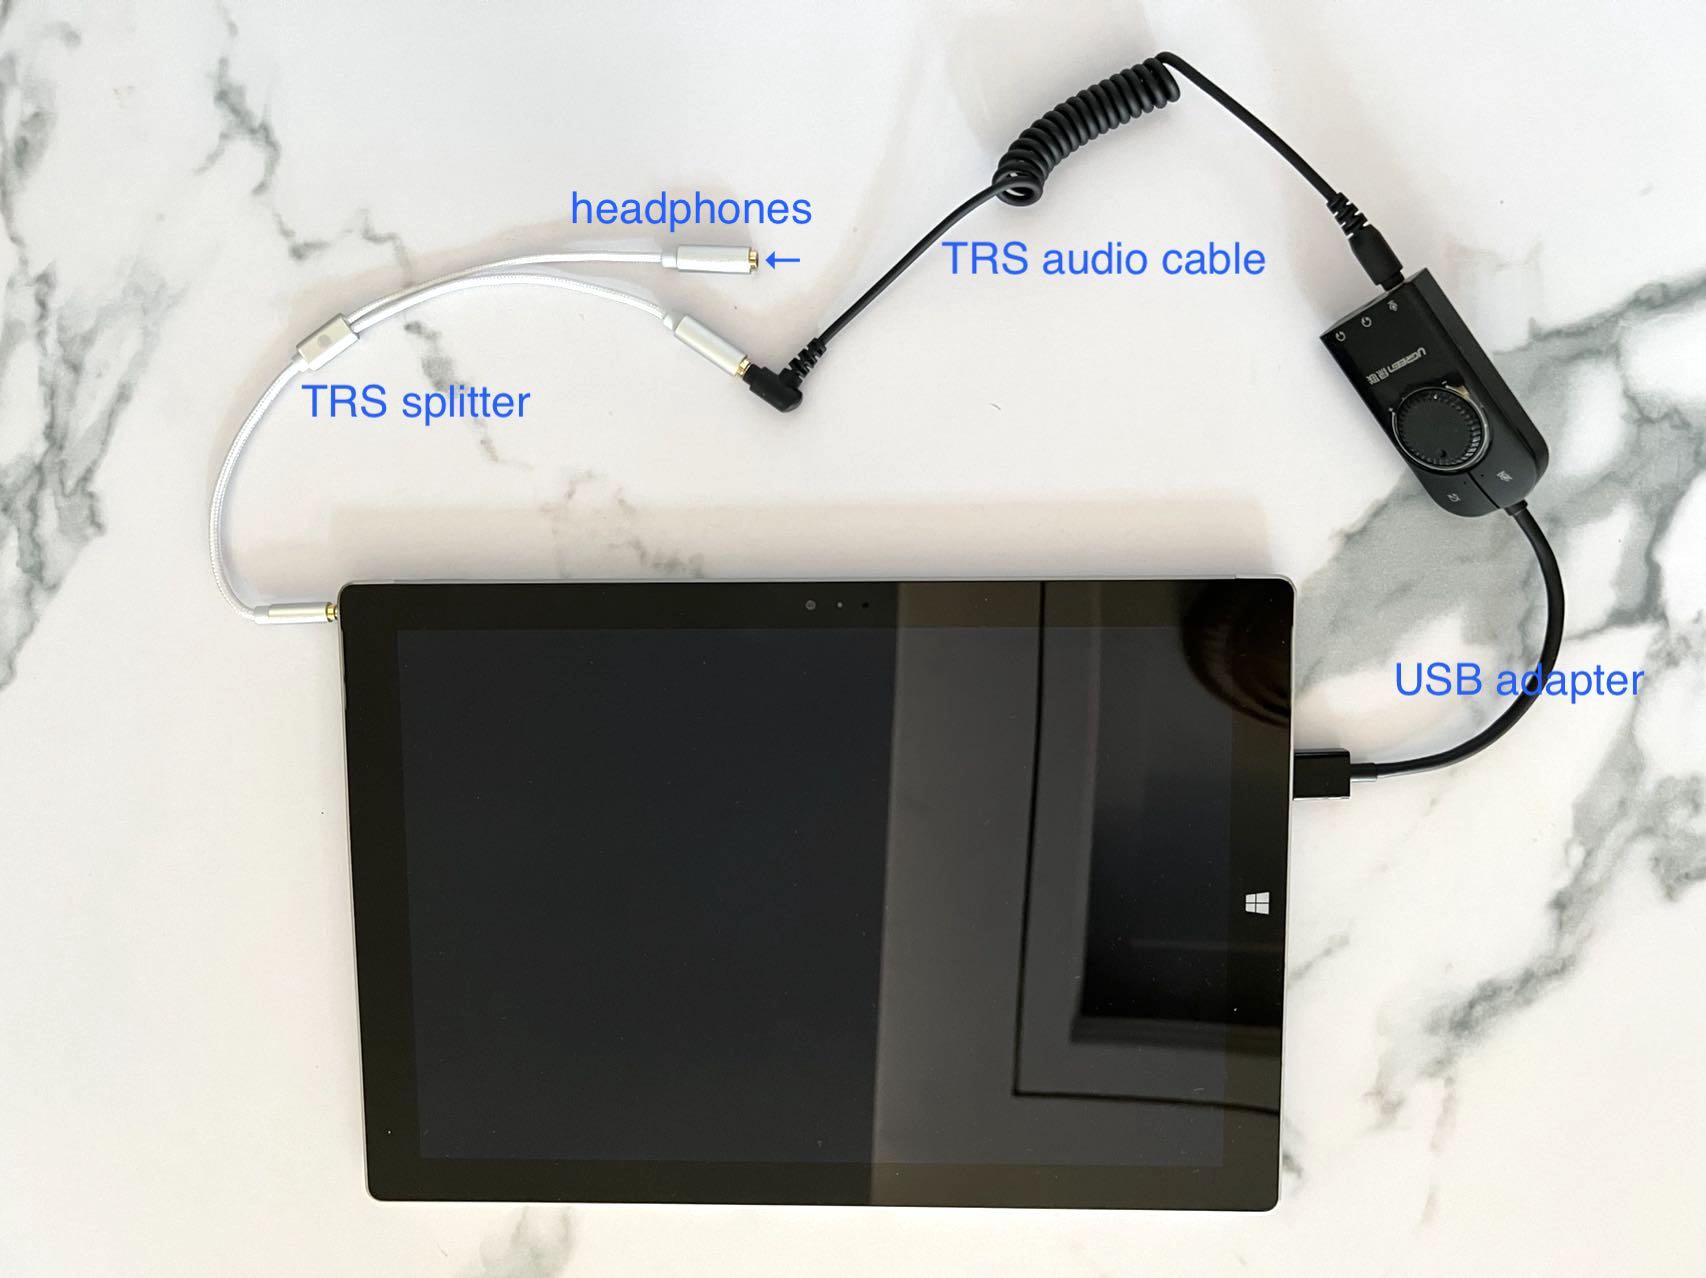
- Plug the male jack of a TRS splitter into your computer's speaker output port.
- Plug your headphone jack into either one of the TRS splitter's female ports to listen.
- Connect the other female port of the TRS splitter with a TRS audio cable.
- Plug the other end of the TRS audio cable into the microphone port of a USB adapter.
- Insert the USB adapter back to your computer's USB port.
- Choose the USB adapter as the audio input source in the Cymo Note Settings Page. (Refresh your device list if needed).
- Make sure your headphones and microphone are working in your video conferencing software.
PC CASE 2:
If you are using these microphones:
- headset with a microphone.
- standalone 3.5mm jack microphone separate from headphone.
You will need the recommended set of cables, i.e. a TRS splitter, a TRS audio cable, and a USB adapter.
If your computer only has one integrated audio port, you will need to plug in an extra TRRS splitter. As shown on the image.
- Plug in the TRRS splitter first into your computer's audio port.
- Plug the male jack of a TRS splitter into the TRRS splitter's headphone port.
- Follow the rest of the steps as described above.
- Make sure your computer still picks up your voice from your microphone through the TRRS splitter's microphone port.
On a second device
Using Cymo Note on a second device is a great option if you prefer to keep different tasks separate on two devices. You can interpret remotely on your main computer, and use Cymo Note on a second device, such as an iPad, an Android tablet, a PC or a Mac. This can be achieved with a hardware connection.
In fact, this is a great way to make use of all Cymo Note's features. You can use your main computer to focus on your virtual meeting, giving it all the computing power it needs to ensure quality and experience, and make good use of your touch screen device for awesome features such as handwriting that Cymo Note provides.
You will need a TRS splitter to send audio to your headphones and the second device. Please refer to the onsite meeting connection method to connect your second device.
This article is made possible with an enormous amount of R&D and testing efforts by the Cymo Team. If you want to share it, please use a hyperlink to link to this page. All rights reserved.